 FR
 Back to the website

La qualité de l’air intérieur (QAI) est un enjeu fondamental pour la santé, surtout considérant que nous passons jusqu’à 90 % de notre temps dans des espaces clos. Divers polluants, présents dans les matériaux de construction, le mobilier, les produits de nettoyage et les activités humaines, peuvent compromettre cette qualité. Les particules fines, les composés organiques volatils (COV) et le monoxyde de carbone (CO) sont des exemples de polluants pouvant entraîner des effets immédiats, comme des irritations et de la fatigue.


A LoRaWAN temperature sensor is only as good as its location. Even an accurate, calibrated sensor will send misleading readings if it sits above a radiator, in direct sun or behind a cupboard. For building managers, facilities teams and installers, getting the installation right is what turns temperature readings into decisions you can trust. This practical guide explains where to install a LoRaWAN temperature sensor, which mistakes to avoid, how to send temperature readings to a building management system (BMS), and how the LoRaWAN temperature sensor VISTA FEEL fits into a connected building.
Why Measure Temperature in Buildings with a LoRaWAN Sensor?
Temperature is one of the key indicators of how a building performs. Room by room temperature monitoring with a LoRaWAN sensor helps you:
- check occupant comfort in offices, schools, hotels and housing;
- control heating and cooling more precisely, and spot rooms that are overheated or too cold;
- prevent condensation and mould, especially when temperature is monitored together with humidity;
- support compliance, for example for UK social landlords who must act on excess cold and damp under Awaab's Law;
- reduce energy consumption by comparing actual temperatures with set points.
LoRaWAN (Long Range Wide Area Network) is a wireless network protocol designed for the Internet of Things and maintained by the LoRa Alliance. A LoRaWAN temperature sensor runs on a battery, needs no cabling and sends small packets over long distances. A single LoRaWAN gateway can collect readings from many sensors across several floors. Several years of autonomy is typical, depending on the reporting frequency.
Compared with a wired temperature probe connected to a controller, a wireless LoRaWAN sensor is faster to install, easier to move, and does not require work on the building's electrical or IT network. This makes it well suited to existing buildings and occupied spaces.
Where to Install a Temperature Sensor for Representative Readings
The aim is simple: the sensor should measure the temperature that occupants actually experience, not the temperature of a wall, a window or a heat source. Follow these key rules.
Choose the right height
Install the temperature sensor at the height of the occupied zone. In practice, many manufacturers and BMS installers recommend mounting room temperature sensors at around 1.5 m above finished floor level. Some guidance suggests 1.5 to 2 m, particularly in rooms heated by radiators. Avoid placing the sensor close to the ceiling, where warm air collects, or close to the floor, where it is cooler.
Use an internal wall
Mount the sensor on an internal wall rather than an external wall. An external wall is colder in winter and warmer in summer, and its surface temperature can affect the measurement. Also check that there is no hot water pipe or heating pipework inside the wall behind the sensor.
Stay away from heat and cold sources
Keep the temperature sensor away from:
- radiators, heaters, fan coil units and air conditioning outlets;
- windows, external doors and draughts;
- direct sunlight, which can raise the reading by several degrees;
- electrical equipment that gives off heat, such as computers, printers, screens or kitchen appliances;
- ventilation grilles and supply air diffusers.
As Schneider Electric's building automation guidance puts it, a sensor should be exposed to the area it controls and not be directly influenced by heat sources such as computers.
Think about air circulation
The sensor needs to be in free air. Do not install it behind furniture, inside a cupboard, behind curtains or in a corner where air does not circulate. In large open spaces, one sensor is rarely enough: install one temperature sensor per zone with similar occupancy and exposure, for example one per side of the building or one per heating zone.
Think about LoRaWAN network coverage
A LoRaWAN temperature sensor must also be placed where its signal can reach a gateway. Before the final installation, check coverage in each room: received signal strength and signal-to-noise ratio are usually visible on the network server or monitoring platform. Avoid installing the device inside a metal enclosure or directly against large metal surfaces, which can weaken the signal. In basements, plant rooms or long corridors, an additional receiver may be needed.
Special cases: external probe and technical rooms
For cold rooms, plant rooms, pipes or tanks, a room sensor is not the right tool. Choose a LoRaWAN transmitter with an external temperature probe, and place the probe at the exact point to be measured. The probe lead should be long enough to keep the transmitter in a place with a good signal, while the probe itself stays in the measured environment. Follow the manufacturer's specification for the probe type, lead length and measurement range.
Common Installation Mistakes to Avoid
Most unreliable temperature readings come from a few common mistakes:
- Installing the sensor above a radiator or next to a heater. The sensor reads the heat source, not the room, and the heating may switch off too early.
- Choosing an external wall or a window reveal. Readings are too low in winter and too high in summer.
- Exposing the sensor to direct sun. Temperature can rise quickly during the day and give false alarms.
- Hiding the sensor behind furniture or in a cupboard. The sensor measures a pocket of still air, not the room.
- Ignoring network coverage. A sensor that loses its connection to the gateway sends incomplete readings. Test the signal before fixing each device.
- Choosing the wrong reporting frequency. Very frequent messages drain the cell faster; infrequent ones can miss short temperature peaks. Set the frequency according to your needs.
- Forgetting to record the location. Each sensor should be named and located on the platform (building, floor, room) on the day of installation, so the readings can be exploited straight away.
- Not checking the readings after installation. Compare the first days of readings with a calibrated reference probe, and adjust the alarm thresholds if needed.
The manufacturer's installation instructions should always be followed: mounting method, minimum distances, configuration and typical operating conditions are part of the product specification.
How to Send Temperature Readings to a BMS via LoRaWAN
Once the sensor is installed, temperature readings need to reach the people and systems that rely on them. A typical LoRaWAN architecture has four parts:
- The sensor measures temperature (and often humidity) at a set measurement interval and sends a small payload.
- The gateway receives the LoRa signal and forwards it over Ethernet or 4G.
- The network server manages the devices and the network, and passes messages to applications. It can be a private server or a public operator network.
- The application or platform decodes the payload with a decoder, stores the values, displays them and triggers alarms.
To integrate temperature readings with a building management system, there are several options:
- BACnet/IP integration: a gateway such as MASTER PRO converts LoRaWAN sensor values into BACnet/IP points that the BMS can read like any other temperature sensor.
- API or webhooks: a monitoring platform such as NAVIXIS can push readings to other systems through an API or webhook notifications.
- Platform dashboards and alarms: facilities teams can work in the platform directly to view temperature trends, export reports and receive alarm notifications.
Before you choose, confirm key points with your integrator: the message format and decoder, the BMS integration method, the reporting frequency and the number of points needed for each building. A clear integration strategy avoids surprises on the day of commissioning.
Installation Checklist: From Plan to Commissioning
Use this checklist to prepare each installation day and save time on site.
Before the installation day
- Read the manufacturer's specification for each device: measurement range, typical battery life, operating conditions and mounting instructions. Every manufacturer gives its own recommendations, and the specification sheet is the reference.
- Prepare a room-by-room plan showing where each temperature sensor and each receiver will go.
- Check the radio coverage of the LoRaWAN network in the key areas, and confirm that the network server and the application are ready to receive the devices.
- Check that the payload decoder for each device is integrated in your platform, so data is readable from the first message.
- Configure the reporting interval and the alarm thresholds in advance.
On the installation day
- Install each sensor following the manufacturer's instructions and the rules above, then note the time and the exact location.
- For a transmitter with an external probe, verify the probe position, the lead routing and the probe connection. Keep the probe lead away from heat sources.
- Confirm that each device appears on the network server and sends its first data.
After the installation
- Compare readings with a calibrated reference probe over the first days. A sensor supplied with a calibration certificate, based on manufacturer calibration in an accredited laboratory, gives more confidence over time.
- Review the alarm settings after one or two weeks of use.
- Keep the manufacturer documentation, the plan and the calibration certificates with the building records.
Budget, lead time and availability
Installation planning also depends on the price and lead time of the equipment. Compare the price per monitored point, including sensors, receivers and platform, and ask the manufacturer for the typical lead time and stock availability before you fix the installation date. A short lead time makes it easier to equip buildings before the heating season. Review each product specification too: operating range, typical battery life and radio specification. For VISTA FEEL, the price is shown in the Nexelec online store.
VISTA FEEL: A LoRaWAN Temperature and Humidity Sensor for Connected Buildings
To apply these installation rules easily, Nexelec offers VISTA FEEL, a 2-in-1 LoRaWAN temperature and humidity sensor designed for offices, schools, hotels and residential buildings, and for Internet of Things projects of any size.
- Accuracy: temperature measured from -30 °C to +70 °C with an accuracy of ±0.2 °C; relative humidity from 0 to 100 % RH with an accuracy of ±2 % RH. Each sensor comes with a calibration certificate from a COFRAC-accredited metrology laboratory.
- Compact size: 28 x 66 mm, in white or black, to blend into the room.
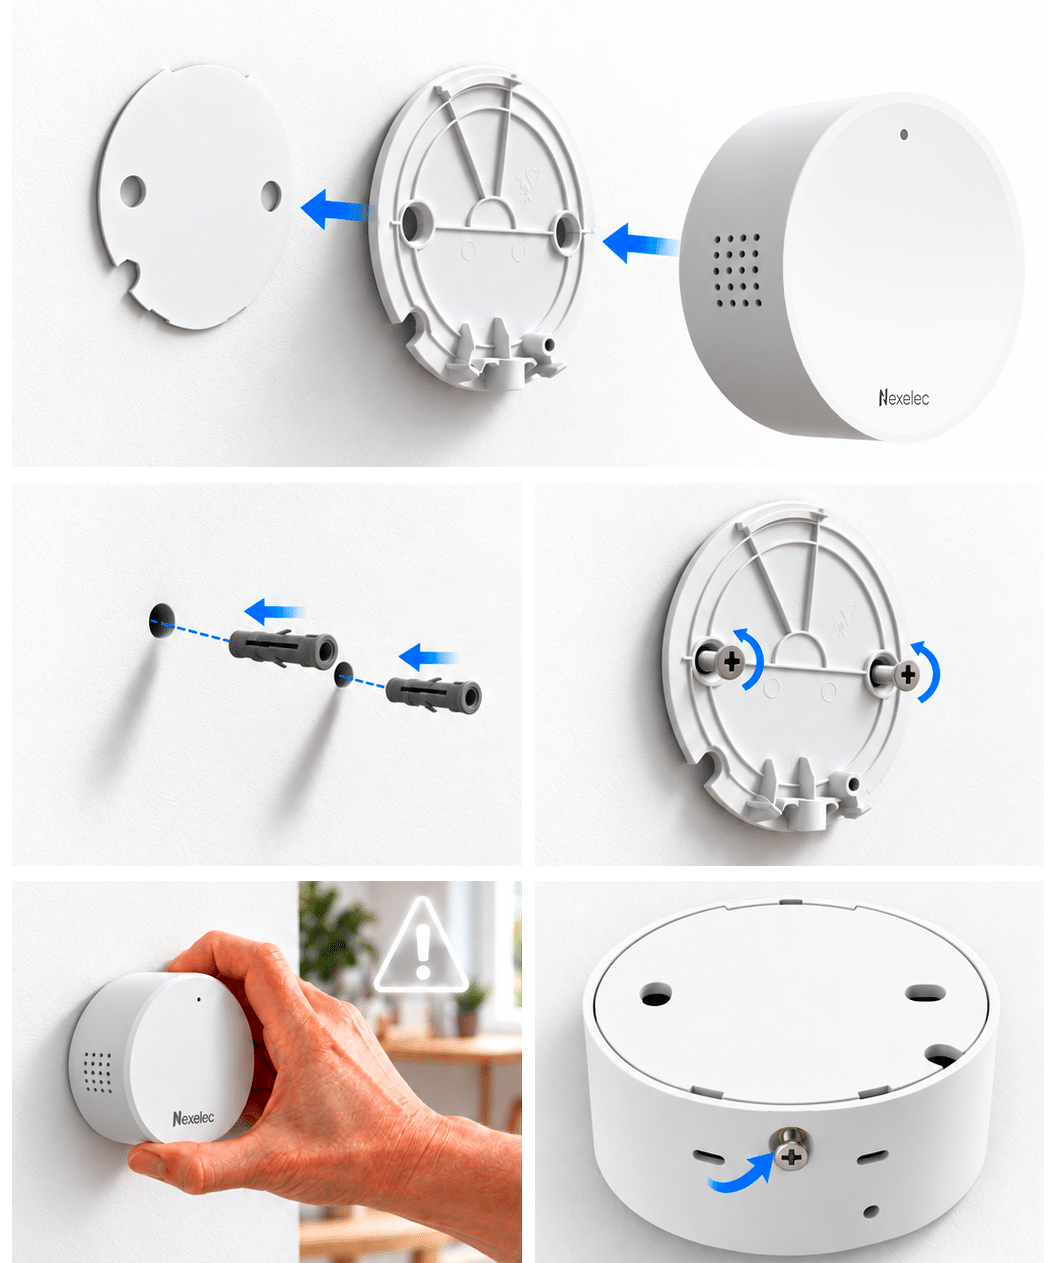
- Easy installation: wall mounting or free-standing, with adhesive, screws and plugs or a locking base, and anti-tamper detection if the sensor is removed.
- Fast configuration: NFC configuration from a smartphone, even inside the packaging, so devices can be prepared before they reach the site.
- Long autonomy: one replaceable CR123 lithium battery, with a stated autonomy of up to 10 years (up to 15 years for the ULL version). Autonomy is not guaranteed and depends on settings.
- Future-proof wireless connectivity: LoRaWAN EU868, FUOTA V2 remote updates and L2D1 direct communication between compatible Nexelec devices.
- Integration: readings integrated in NAVIXIS, or in the BMS as BACnet/IP points through MASTER PRO.
The older FEEL room sensor is still available, and you can compare both in the Nexelec range of temperature and humidity sensors. To control heating room by room, combine temperature readings with LoRaWAN thermostatic heads; to monitor ventilation, add an indoor air quality sensor.
Frequently Asked Questions
What is a LoRaWAN temperature sensor? It is a wireless Internet of Things (IoT) device that measures room temperature and sends its data over a LoRaWAN radio network to a gateway. Battery-powered sensors are one of the simplest connected things to add to an existing building, and they support temperature monitoring without cabling.
At what height should a LoRaWAN temperature sensor be installed? At the height of the occupied zone, typically around 1.5 m above floor level, on an internal wall, away from heat sources, windows and direct sun.
How many temperature sensors does a building need? At least one per zone with similar occupancy and exposure. Large open spaces, rooms facing different directions and separate heating zones each need their own sensor.
Can a LoRaWAN temperature sensor be connected to a BMS? Yes. Readings can be converted into BACnet/IP points through a gateway such as MASTER PRO, or sent from a platform such as NAVIXIS through an API.
How often should a LoRaWAN temperature sensor send readings? It depends on your needs. A reporting interval of several minutes is usually enough for comfort monitoring; more frequent messages reduce battery life.
Conclusion
Reliable temperature readings start with the right installation: the correct height, an internal wall, distance from heat sources and good network coverage. Combined with a clear integration strategy, a LoRaWAN temperature sensor becomes a dependable tool for comfort, energy and compliance. To equip your buildings, discover the LoRaWAN temperature sensor VISTA FEEL, check its price in the Nexelec online store or request a quote.
This news may interest you
Nexelec's news

